Hello! In this article, I`m gonna cover validations in a Spring Boot app. The only requirement for you to understand this topic is to be able to create controllers in Spring Boot and of course, be comfortable with Java.
You can find source code for examples here: https://github.com/kamer/validations-in-spring-boot
Why do we need both client-side and server-side validation?
In web applications, we generally use both client-side and server-side validations for form data or any other data that goes to server-side. Why do we bother with both of them?
Because we use client-side validation to validate and respond quickly. For instance, we have a field that accepts phone number. So, first of all, we should prevent user to type any character other than numbers. Also, we have a pattern that validates phone number. If we control and reject any incorrect input value on the client-side we eliminate the time for this request to go server-side and get rejected. So we can say that client-side validations are mostly used to give user fast feedback and validate syntactical things. (e.g. pattern, length, characters)
But client-side validations can be considered useless since they can be easily manipulated or disabled. Here’s a great representation what it is like to trust any kind of client-side validation.

If we go on with the above image, we should create a validation mechanism that rejects any other number than 911 as input. Here’s where server-side validation comes into play. Briefly, server-side validation is our last chance to reject incorrect inputs properly. Also, we validate constraints that need more logical operations on server-side. For instance, rejecting creation of an employee if the manager of the department is not assigned yet. Enough for introduction, let’s get our hands dirty.
Javax Validation Constraints
javax.validation is the top-level package for Bean Validation API and it has some predefined annotation-based constraints in constraints package for us to use. Here are some examples.
- If we want to check a field if it’s null, we use
@NotNullannotation.
@NotNull(message = "Name cannot be null.")
private String name;
In the above example name field cannot be null. But it can be empty. If we use @NotBlank name cannot be null and must contain at least non-whitespace one character or if we use @NotEmpty annotation name cannot be null and name.length() > 0. So it can accept a String that has whitespace character.
- If we limit any number input we use
@Maxand@Minannotations.
@Min(value = 3, message = "Experience must be at least 3 years.")
private Integer experienceInYears;
@Positive,@Negative,@PositiveOrZeroand@NegativeOrZeroannotations do what their name suggests.
@PositiveOrZero(message = "You cannot have negative numbers of children.")
private Integer numberOfChildren;
@Sizeannotation gives minimum and maximum values for size of anything. (CharSequence, Collection, Map, Array)
@Size(min = 2, max = 35, message = "Surname must be 2-35 characters long.")
private String surname;
@Past,@Future,@PastOrPresent,@FutureOrPresentannotations validate date types according to their name.
@Past(message = "Date input is invalid for a birth date.")
private LocalDate dateOfBirth;
- You can validate any regex pattern with
@Patternannotation.
@Pattern(regexp = "^4[0-9]{12}(?:[0-9]{3})?$", message = "Only Visa cards are accepted.")
private String cardNumber;
- No need to explain
@Mailannotation.
@Email(message = "Enter a valid email address.")
private String email;
I explained the most important ones above. If you want to see the others you can find them here.
I created a dummy example to try these constraints and show validation messages on form inputs with Thymeleaf. We should annotate controller input with @Valid to activate these constraints.
@PostMapping("/javax-constraints")
String postJavaxConstraints(@Valid JavaxValidationConstraints javaxValidationConstraints, BindingResult bindingResult) {
   ...
   ...
   ...
}
Then show error messages on Thymeleaf.
Creating Your Own Validation Annotations
If you have followed previous chapter well you should’ve seen that you achieve almost anything with Javax Validation Constraints. But sometimes defining your own annotations can seem a much better option though.
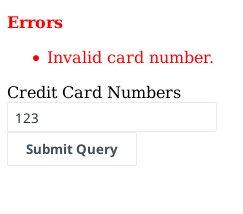
Here’s one example. We want to validate creditCard field with @Pattern.
@NotEmpty(message = "You must enter a credit card number.")
@Pattern(regexp = "^(?:4[0-9]{12}(?:[0-9]{3})?|[25][1-7]"
		+ "[0-9]{14}|6(?:011|5[0-9][0-9])[0-9]{12}"
		+ "|3[47][0-9]{13}|3(?:0[0-5]|[68][0-9])"
		+ "[0-9]{11}|(?:2131|1800|35\\d{3})\\d{11})$",
	    message = "Invalid card number.")
private String creditCard;
Do you see any problem here? It seems too ugly considering we will have at least 5 more fields with at least 2 validation annotations and so on. In this type of situation we can choose defining our own annotation.
First of all create an annotation as below.
@Documented
@Constraint(validatedBy = CreditCardValidator.class)
@Target({ ElementType.FIELD })
@Retention(RetentionPolicy.RUNTIME)
public @interface CreditCard {

    String message() default "Invalid card number";
    Class<?>[] groups() default {};
    Class<? extends Payload>[] payload() default {};
 }
We want our annotation to serve at runtime, to be used with field types and to be validated by CreditCardValidator class.
So here’s our validator class.
We implement ConstraintValidator<[AnnotationsName], [TargetType]> and enforcedly override initialize() and isValid() methods.
initialize method is guaranteed to be run before any use of this validation and isValid method is where we reject or accept any value.
public class CreditCardValidator implements ConstraintValidator<CreditCard, String> {

      private static final String CREDIT_CARD_REGEX = "^(?:4[0-9]{12}(?:[0-9]{3})?|[25][1-7][0-9]{14}|6(?:011|5[0-9][0-9])[0-9]{12}|3[47][0-9]{13}|3(?:0[0-5]|[68][0-9])[0-9]{11}|(?:2131|1800|35\\d{3})\\d{11})$";

      private static final Pattern CREDIT_CARD_PATTERN = Pattern.compile(CREDIT_CARD_REGEX);

      @Override
      public void initialize(CreditCard constraintAnnotation) {

      }

      @Override
      public boolean isValid(String creditCardNumber, ConstraintValidatorContext context) {

	      Matcher matcher = CREDIT_CARD_PATTERN.matcher(creditCardNumber);

	      return matcher.matches();

      }
}
Our annotation is ready. Let’s use them like the ones above.
@PostMapping("/custom-constraint-annotation")
      String postCustomConstraint(@Valid CustomConstraintAnnotation customConstraintAnnotation, BindingResult bindingResult) {

	      if(bindingResult.hasErrors()){

		      return "custom-constraint-annotation";
	      }
	...
	...
	...
    }
}
All validation errors are saved in BindingResult object and we can show error messages with Thymeleaf.
<form role="form" th:object="${customConstraintAnnotation}" th:action="@{/custom-constraint-annotation}" th:method="post">

    <div style="color: red;" th:if="${#fields.hasErrors('*')}">
	<p><strong>Errors</strong></p>
	<ul>
	    <li th:each="err : ${#fields.errors('*')}" th:text="${err}"></li>
	</ul>
    </div>

    <label>Credit Card Number</label>
    <br>
    <input type="text" id="creditCard" name="creditCard" th:field="*{creditCard}">
    <br>
    <input type="submit">
</form>
Combining Multiple Annotations
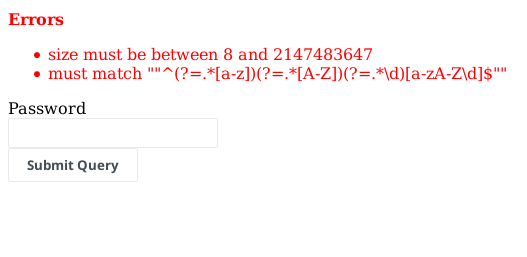
Another way of implementing good validations is combining multiple validation annotations. Hibernate documentation calls it Constraint composition. It’s quite simple. First of all create an annotation type and fill as below.
@NotEmpty
@Size(min = 8)
@Pattern(regexp = "\"^(?=.*[a-z])(?=.*[A-Z])(?=.*\\d)[a-zA-Z\\d]$\"")
@Target({ METHOD, FIELD, ANNOTATION_TYPE })
@Retention(RUNTIME)
@Constraint(validatedBy = {})
@Documented
public @interface CombinedPasswordConstraint {

      String message() default "Invalid password.";

      Class<?>[] groups() default {};

      Class<? extends Payload>[] payload() default {};
}
You can add different messages for each annotation. Then use it like the other constraints.
Creating Custom Validator Class
We’ve been through constraints so far. It’s time to create a more complicated validation with a custom validator class. In previous examples we’ve validated syntactical things. But generally we need more complicated things that possibly need a database query.
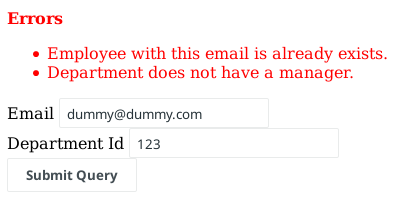
I’m repeating prior example. You have created a department in your imaginary app. Then you try to add a new employee to this department. But you want to add a constraint that requires assigning a manager before assigning an employee. So you should add a validator that checks either this department has a manager or not. This is possible with custom validator. But you can also validate simple things like regex patterns.
Let’s create one.
I’m gonna show you a simplified example. First of all, create a dummy class and fill it as below.
public class CustomValidationEntity {

      private String email;

      private Long departmentId;

      public Boolean existManagerByDepartmentId(Long departmentId) {

	      return false;
      }

      public Boolean existEmployeeWithMail(String email) {

	      return true;
      }

}
It will always say ‘department has no manager’ and ‘this email already exist’ whatever we enter.
Then create validator class as below. I’m gonna explain details.
@Component
public class CustomValidator implements Validator {

      @Override
      public boolean supports(Class<?> clazz) {
	      return CustomValidationEntity.class.isAssignableFrom(clazz);
      }

      @Override
      public void validate(Object target, Errors errors) {

	      CustomValidationEntity customValidationEntity = (CustomValidationEntity) target;

	      if (customValidationEntity.existEmployeeWithMail(customValidationEntity.getEmail())) {

		      errors.rejectValue("email", null, "Employee with this email is already exists.");
	      }

	      if (!customValidationEntity.existManagerByDepartmentId(customValidationEntity.getDepartmentId())) {

		      errors.reject(null, "Department does not have a manager.");
	      }

      }
}
This Validator interface that we extend is org.springframework.validation.Validator;. Not javax… one. This interface gives us two methods.
supports() method controls if the target object is what we intended to validate and validate() method is where we control and reject things.
You can reject the whole object and add a global error message with reject() or reject a single value and add an error message for this value with rejectValue(). Then you should annotate this class with @Component.
Let’s use our validator. But we will do something different than using constraints. After annotating object parameter in the controller with @Valid, we will add an InitBinder method in that controller.
@InitBinder
private void bindValidator(WebDataBinder webDataBinder) {
    webDataBinder.addValidators(customValidator);
}
This @InitBinder annotated method will initialize WebDataBinder. Since WebDataBinder prepares objects that come from requests for controllers, it can validate before the request reaches controller. That’s it. Let’s try our example.